If you are looking for a really easy way to create an online form for free and start collecting information in 5 minutes flat, follow this step-by-step tutorial.
Creating a fillable online form doesn't require a developer. Of course you can go the hard route and try to figure out how to create a form with code but why in the world would you dare try if there is a much easier way?
I like simple and Google Forms is just that - simple!
Steps to follow (click the step for screenshots):
- Log into your Google account (also your gmail account)
- Go to forms.google.com
- Click the plus sign to create a new form
- Adjust the Google form theme to your liking
- Give the form a title and description
- Create and set up your questions
- Create necessary form sections
- Adjust final form settings
- Select or create your form collection spreadsheet
- Name your form
- Share the form via email, link, or embed
Detailed Instructions
1. Log into your Google Account
To get started with your free online form creation, select the Gmail account (Google Account) you want the form to be associated with. If you do not have a Gmail account, click here to get started.
2. Access Google Forms
You might not have known this, but having a Gmail account gives you access to Google Sheets, Google Docs, Google Slides, Google Forms and more. It's all free!
To create your first Google Form, just click here or type google.forms.com in a new browser tab.
3. Create a New Form
To create your first Google Form, get started by clicking the plus icon in the lower right of the screen.

4. Adjust the Form Style
Google gives you the ability to adjust some basic styling options. You can upload your own form header image or select one from their gallery.
Next, adjust the theme color by adding your own or selecting a pre-created option.
Then select the background color that will show behind the form.
Finally, there are some limited font settings you can choose from. I wish you could select any of the Google Font options, but forms offers a puny selection.

5. Form Title and Description
The form starts with a default option for a title and description. This is nice for introducing the form and giving any necessary instructions to users.
To add your title and description just click and type.

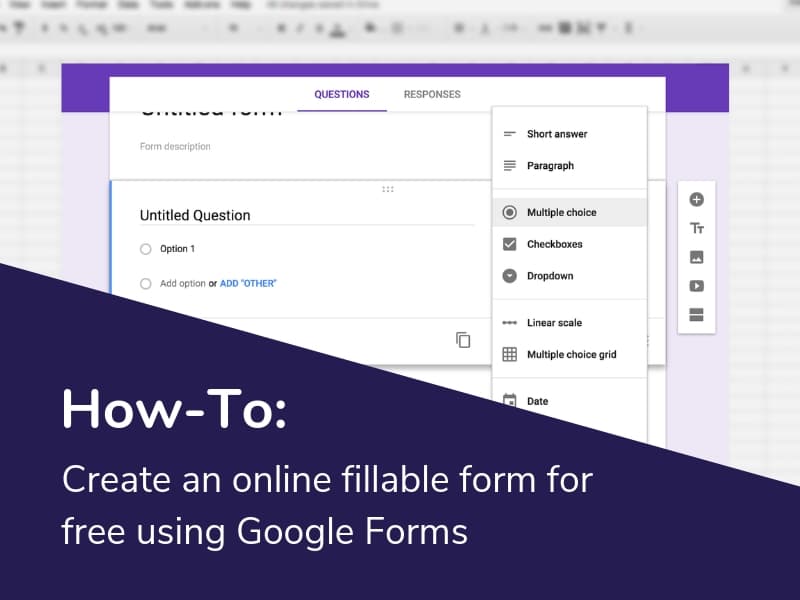
6. Create Your Form Questions
Google Forms comes equipped with a bunch of question options. You can choose from:
- Short Answer
- Paragraph Answer
- Multiple Choice
- Checkbox
- Dropdown
- File Upload
- Linear Scale
- Multiple Choice Grid
- Checkbox Grid
- Date
- Time
Within each question type there are some other available options you can select as well to refine the question to your form collection needs.

7. Divide Your Form into Sections
Unless you are creating a simple contact or lead capture form, I recommend dividing your online form into sections.
This will make the form much easier to complete and it will actually increase the completion rate because users won't feel overwhelmed with a really long single page form.
I recommend this for registration forms, sign-up forms where you are a fair amount of details, quizzes and tests, runner check-in forms, school visitor databases and others like these.

8. Adjust the Final Form Settings
This is where other free form options tend to make you start paying for things.
With Google Forms you can decide whether the user should get a copy of the answers emailed to them, be able to submit the form again, submit 1 time or multiple.
You can also adjust your confirmation message to display once the form is completed, show a progress bar, or my favorite, mix the questions up at random so cheating people can't give answers to someone else if you turn the form into a test.
As I mentioned, Google Forms can become a formidable online test or quiz software. The quiz portion includes features like:
- auto grading
- answer values
- showing correct answers


9. Choose or Create an Answer Collection Spreadsheet
I really like the fact that Google Forms integrates directly with Google Sheets.
In this step you can either choose an existing Google Sheet that your form entries should feed into or you can create one easily from the Google Forms interface.

10. Name Your Form
With your new online form ready to go, you are ready to start collecting submissions.
Don't forget to give the form a name first.
You do not need to save the form because all of Google's Products auto-save as you work.


